So, I said I’d write about my own work process at Pilchuck and now seems to be the right time.
It’s pretty hard not to be inspired and perhaps a bit overwhelmed by this place.
And after seeing a first-day presentation of the work of my instructor and the TAs — beautiful little glass structures that both contained and reflected exquisite animations — we were given the task of thinking of a small piece, possibly a domestic object, that we could build from glass as a way of objectifying animations we would make. As I mentioned in an earlier post, Lienors is working on the idea of using glass as an alternative to installations. She wants a return to art as more permanent object — less transitory.
My first thought was a fireplace. I pictured it as something solid that a whole house might be built around. I wasn’t sure whether to go with an intact fireplace or whether a fireplace as the only thing remaining at a ruined site might be a better choice. Lienors and I talked about this and decided that the animation could convey both — a pristine fireplace that becomes degraded. I liked the idea but was dismayed at the materials and process at hand. We were to build from very thick sheet glass and use coldworking techniques that we’d be learning. I was terrified to even try to cut this glass, and sure enough, even with a beautiful running score tool, my cuts were terrible. But the stack of rawly cut glass looked interesting and, hey, coldwork would solve all my problems. Perhaps if I had taken the TA’s advise and used the saw right away to do the initial cutting, things would have gone better. But I was afraid of the saw. Some of the straight cuts that turned out as curves were interesting shapes and I decided to use them as part of the design. I would just grind everything after gluing to make the curves ‘line up’.

1st mockup of fireplace
So it was time to start the first round of gluing my stacks of glass. I tried the UV glue, which was too thick because it was really intended for constructing corners (fish-tank style) and found that the clear stacks were muddled with wiggly glue lines. Lienors and I tried the razor blade as squeegee technique and it helped a bit. In fact it may have been perfect if the glue hadn’t been so thick. I thought I’d solve this by sandblasting, something that hadn’t really been part of my initial plan. But it gave me the idea to sandblast brick designs using contact paper as resist and also get some more stonelike images using the glue-gun as resist.
This turned out well, but the grinding was horrific! Not so much the grit wheel. I’ll use that any day and would love one at home. But it was slow and eventually I was using the saw for some of the thick bottom edges. It wasn’t all that bad. But the lathe was beyond my skill level. I chipped edges and had the guys laughing at me every time they heard the clunk sound (which meant I once again lost control and ended up with my piece hitting the wrong part of the machine.) So, I thought about even more strategies to rescue the piece, including gluing the top pieces on. This time I thought the epoxy in the little double squishy tubes might be good to use. Gluing on sandblasted glass is ridiculous because any bleeds out removes the etched look. Then it was razor blade time… well, actually at that point I decided to chalk this one up as a Great Learning Experience.
By the time I made the decision that I didn’t want to do anything further with my first attempt at glass assembly, we were ready to do our second casting (my first is a message in a bottle), and although it is still in the kiln, I know that the process of building the clay form and making the mold is within my ability because it did go fairly smoothly from the get-go. So I’m still making a fireplace. But this one will be cast from beautiful clear glass and will have rounded forms and will probably require coldwork but not the lathe.
And I will still have a plate-glass piece because I started from scratch, sandblasted a base and sandblasted a kiln-formed chunk I had brought from home that I will glue to the base. Ultimately I’d like this beachy looking thing to be on a driftwood stand (or perhaps a railroad tie). It can have my beachglass music animation projected on it and all will be well.
As for degrading the glass fireplace, right now I have an animation of fire and I might just use that instead. I am thinking that the warm and cozy look might be more “me” rather than thinking about decay. Anyway, process and product!
-
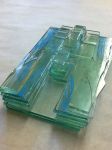
- 1st mockup of fireplace


-
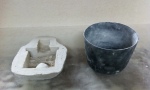
- Measure water in bowl, fill mold with water from bowl and discard water from mold, add glass to remaining water in bowl to reach the original fill line (displacement estimation)